Login
You're viewing the mstdn.social public feed.
  • Jun 5, 2026, 7:11 PM

    Interlude: 3D Printing Miniatures...

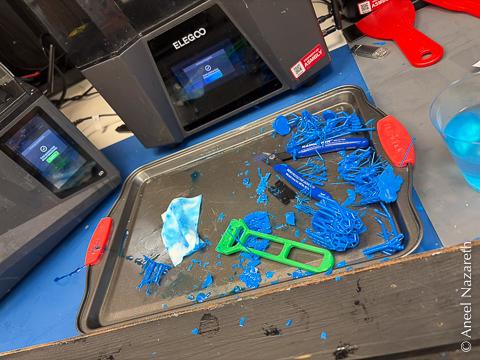
    I was pretty unsatisfied with the results of casting with filament prints, even with a 0.25mm nozzle, so I switched to resin prints. Resin printers promise a resolution about ten times finer than that (25 μm). I tried printing with a special wax-based resin so that it burns out with practically no ash. It turned out to be a giant pain to work with. I had terrible layer adhesion and parts would just fail in the middle. I'd be lucky to get a couple salvageable models out of a tray of a dozen. On the plus side, resin printing prints a whole layer at once, so it doesn't take any more time to print a dozen models than it does to print one.

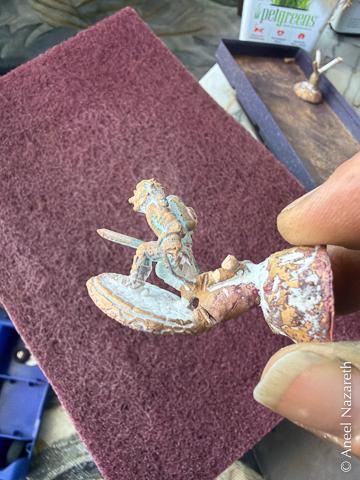
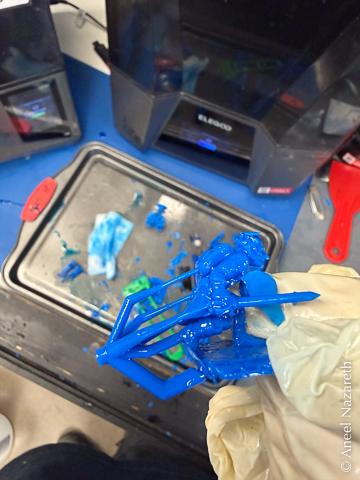
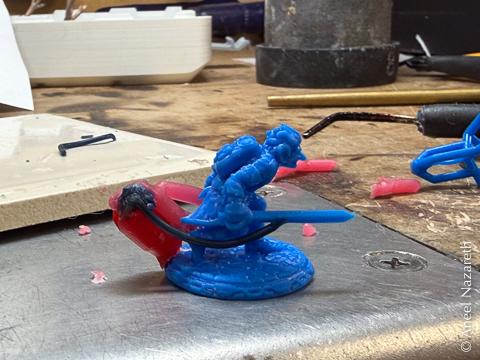
    To see if I could, I tried printing a custom model of a Pathfinder (NOT D&D) character of mine that I'd worked up on HeroForge. Initially, I tried spruing it for casting using traditional wax. Predictably, this led to a globby mess because the wax didn't stick very well to the print and I had to use too much. [8/18]
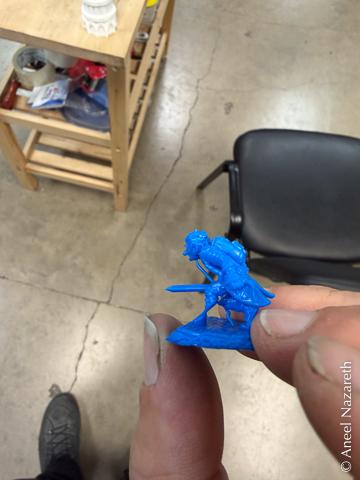
    A miniature of a goblin with a sword in blue 3D printed wax resin
    The miniature sprued with wax
    A casting with a bunch of globby sprue metal
    💬 1🔄 0⭐ 0

Replies

  • Jun 5, 2026, 7:11 PM

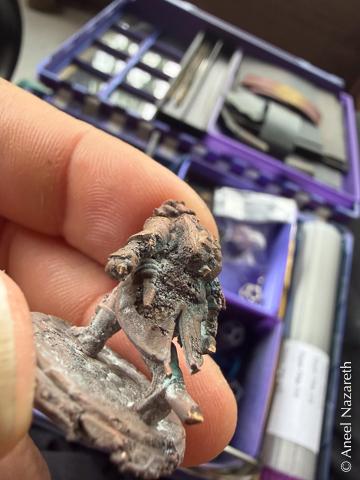
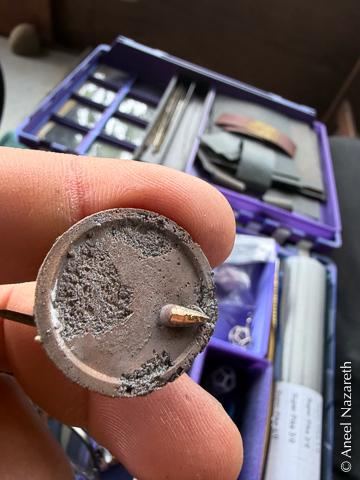
    Because of my abysmal printing success rate with the wax resin, I tried the same print using a conventional ABS-like resin. I got a terrible surface texture on that, probably because the resin didn't burn out completely and stuck to the plaster. I went back to the wax resin and started focusing on designing casting sprues to be printed, rather than attached after the printing. [9/18]

    Surface pitting on the back of the model is pretty bad
    Pitting is very obvious on the base, which should be smooth and flat
    A whole tray of shards of blue print failures
    A successful print of a model with designed sprues
    💬 1🔄 0⭐ 0
  • Jun 5, 2026, 7:11 PM

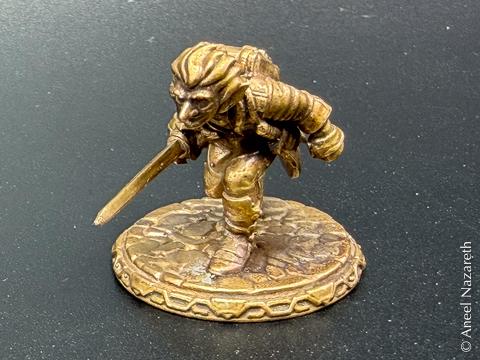
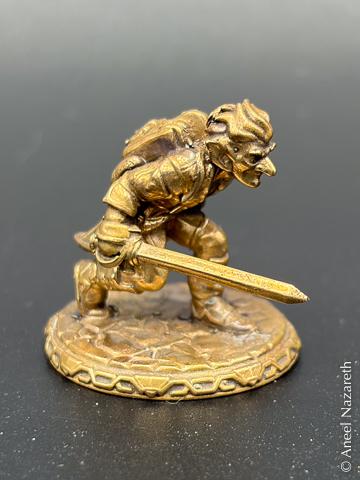
    By the end of the semester, I did dial it in well enough to get a good cast of the miniature.

    ... End Interlude [10/18]

    Closeup of a miniature of a goblin with a sword
    The miniature from the front
    The miniature from the side
    💬 1🔄 0⭐ 0
  • Jun 5, 2026, 7:11 PM

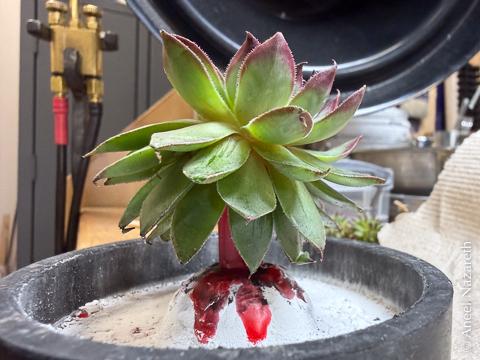
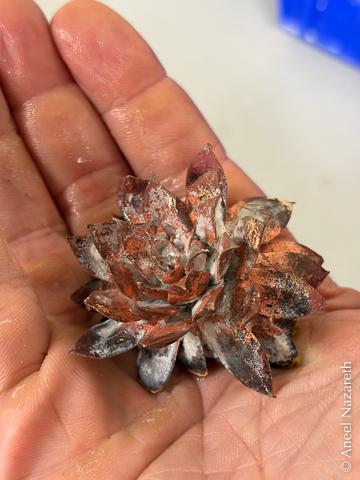
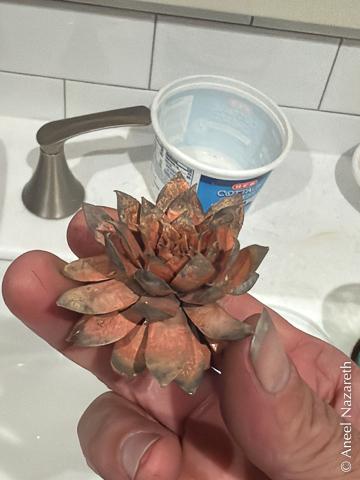
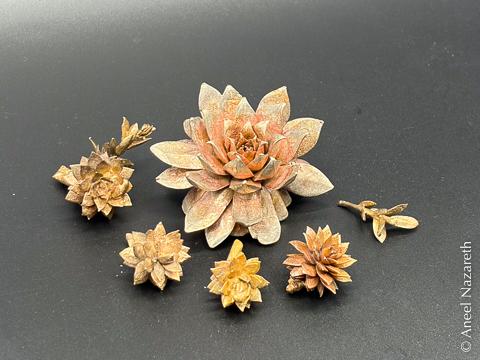
    We had a guest presenter for one of our classes. Chad gave us some tips for casting organics. Instead of sculpting plants or insects in wax, why not cast the actual plants or insects? I mean, besides the obvious: they'll be immolated in the kiln. I bought some succulents, and cast some of the ones that the cats didn't eat before I could bring them in to class. This worked really well! [11/18]

    A aloe-like succulent attached to a flask base with sprue wax
    The bronze casting of the succulent. There is an inordinate amount of investment caught between the leaves
    The investment has been cleaned off in the ultrasonic cleaner
    The large succulent casting and several smaller similar castings
    💬 0🔄 0⭐ 0
  • Jun 5, 2026, 7:11 PM

    A surprise: when casting, you need to know how much metal to use. Theoretically, you want to use the same volume of metal (with some to spare for the sprues and button) as your model. Measuring volume of irregular objects is a challenge (before you say "Eureka!"... water displacement is surprisingly hard at this scale).

    Happily, the density of jeweler's wax is well known, as is that of each of the metals we're using, so we can get away with weighing with a conversion factor (ancient bronze is 9 times heavier than wax, sterling silver is 11 times heavier).

    We guessed that the succulents would be about as dense as the wax, but it turned out they were significantly less dense. This meant that I didn't melt enough metal to fill the whole mold. As a result, the bottom leaves of the succulent just... end... at a certain point. This does mean that the casting has a flat bottom so it sits on a table better. [12/18]

    💬 1🔄 0⭐ 0
  • Jun 6, 2026, 10:46 PM

    A surprise: when casting, you need to know how much metal to use. Theoretically, you want to use the same volume of metal (with some to spare for the sprues and button) as your model. Measuring volume of irregular objects is a challenge (before you say "Eureka!"... water displacement is surprisingly hard at this scale).

    Happily, the density of jeweler's wax is well known, as is that of each of the metals we're using, so we can get away with weighing with a conversion factor (ancient bronze is 9 times heavier than wax, sterling silver is 11 times heavier).

    We guessed that the succulents would be about as dense as the wax, but it turned out they were significantly less dense. This meant that I didn't melt enough metal to fill the whole mold. As a result, the bottom leaves of the succulent just... end... at a certain point. This does mean that the casting has a flat bottom so it sits on a table better. [13/19]

    💬 1🔄 0⭐ 0
  • Jun 6, 2026, 10:46 PM

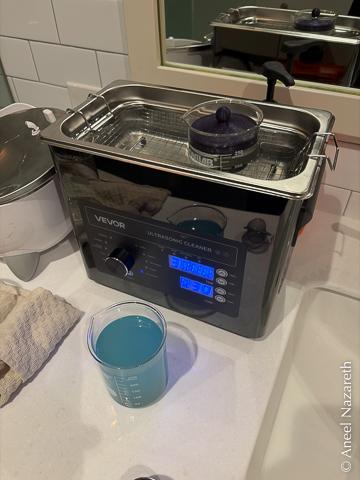
    Another surprise: just how hard it is to clean investment from between the leaves of a succulent. I ended up actually buying an ultrasonic cleaner for home and just running the casting through it in a beaker full of vinegar until the plaster dissolved. [14/19]

    An ultrasonic cleaner sitting on the counter in my bathroom. It is a blocky machine with a basin of water in the top. In the water is a beaker with a lid on it. On the counter is another beaker filled with blue liquid. The blue is from the copper in the bronze reacting with the vinegar.
    💬 1🔄 0⭐ 0
  • Jun 6, 2026, 10:46 PM

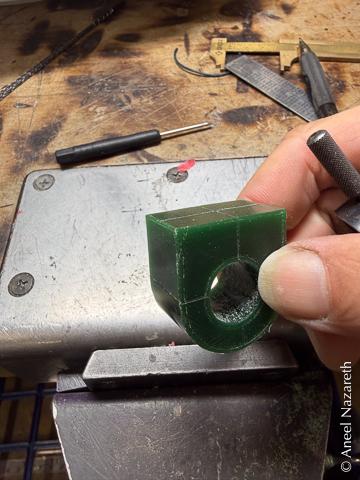
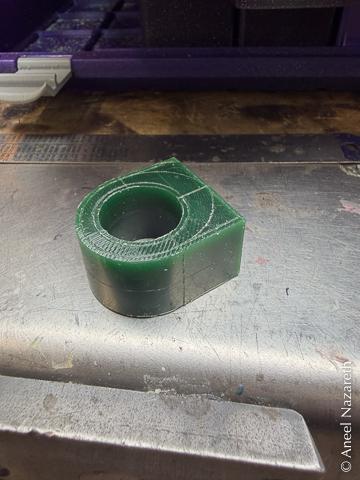
    The final assigned project for the class was a dome ring. This was mostly an exercise in precision wax sculpting. We were given detailed instructions on how to scribe certain marks on a ring blank and then smooth that down to a ring with a large domed crown and a hollow behind it. This was actually somewhat like my chunky onyx ring, but designed by someone who'd actually considered the ergonomics of a ring before carving.

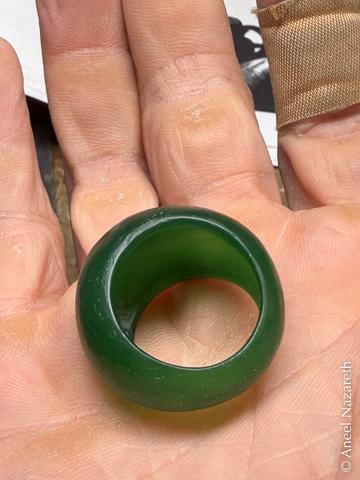
    I'm pretty happy with how my carving turned out, and the ring fit my partner's finger, so I decided to splurge and cast it in silver. I hollowed out the ring to about a 2mm thickness throughout to minimize the weight.

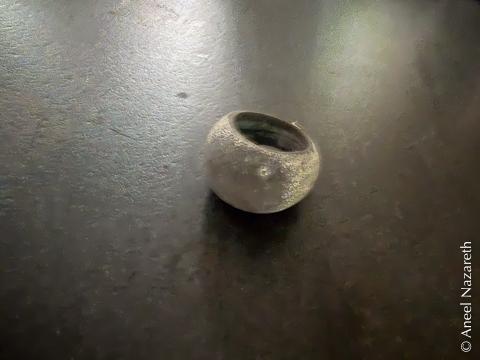
    The results were... weird. [15/19]

    A ring blank with various alignment marks
    Even more alignment marks, now showing the oval shape of the dome
    The finished sculpt has been hollowed out to about 2mm even in the thick parts
    The cast version of the ring has a strange dark cast to the dome and an almost powdery surface
    💬 1🔄 0⭐ 0
  • Jun 6, 2026, 10:46 PM

    I didn't get an in focus picture of the surface of the ring, but it was very rough, with strange coloration. I took it to the department chair who suggested two things had gone wrong: I had gotten the silver too hot, and the silver hadn't been pure. If investment isn't fully cleaned off of a casting and the metal is re-used, impurities build up in the silver.

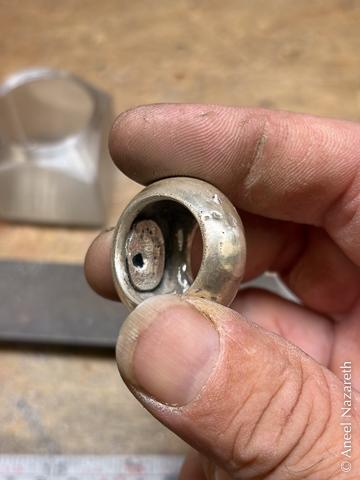
    He pointed out another problem. There was a giant bubble under the dome. After going to all of the trouble to hollow out the dome, I sprued it so that it was standing straight up, meaning that air was trapped under the dome as I poured the investment into the flask. Oops.

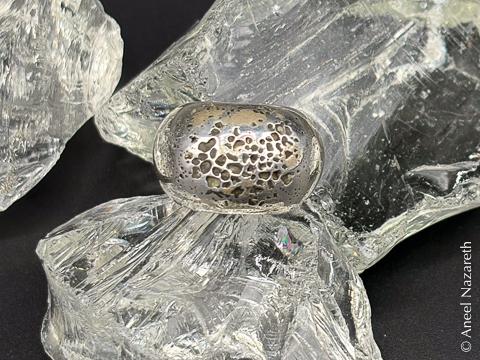
    I polished the ring anyway, hoping to smooth out the rough surface, and something extraordinary happened. [16/19]

    Looking into the dome of the ring, there's a large bubble of silver filling most of the hollow
    The ring is photographed among some pieces of glass. It has many deep pits in it, looking almost like lunar craters
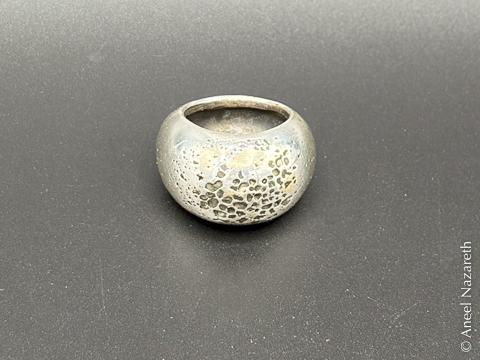
    Another view of the ring without the glass
    💬 0🔄 0⭐ 0
  • Jun 6, 2026, 10:46 PM

    The surface problems weren't surface problems at all. They were porosity throughout the metal. When polished, the pretense of a smooth surface dissolved and left a cratered texture. The ring looks like a piece of the moon!

    What could have caused all of that impurity? [17/19]

    💬 1🔄 0⭐ 0
  • Jun 6, 2026, 10:46 PM

    ## Interlude: 3D Printing dodecahedra...

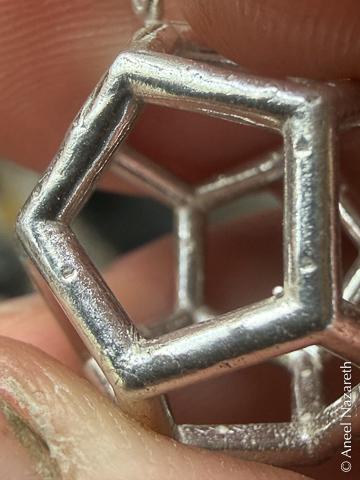
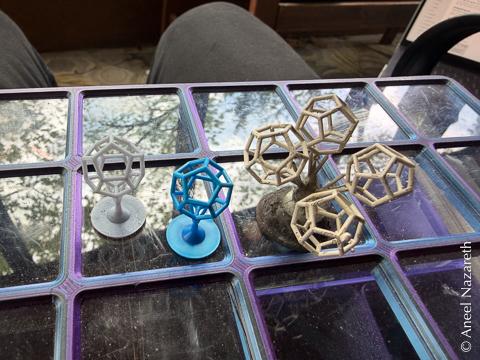
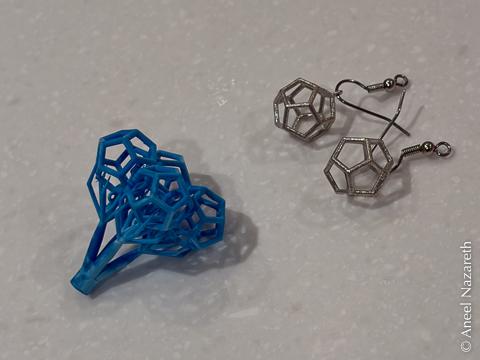
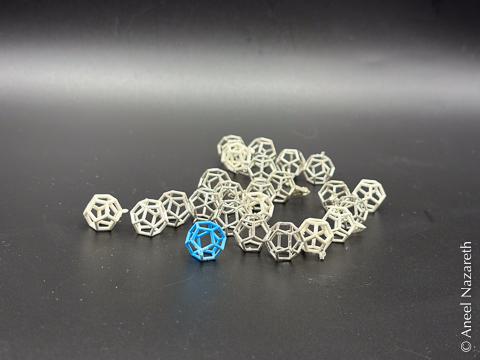
    I mentioned those dodecahedra that I'd cast in bronze from filament 3D prints in an earlier post. Well, I never gave up on that. I kept iterating. I was unhappy with the marks that autogenerated sprues for printing left on the surface, so I modeled custom sprues... I wanted to add a bail so the dodecahedron could be used as a pendant, and, rather than try to solder it on, I modeled that too... My instructor suggested that they'd make good earrings, so I worked on making them smaller... I couldn't get the surface texture perfect, so I tried curing the resin prints under glycerin so they wouldn't be exposed to oxygen during the cure... [18/19]

    Small divots on the silver surfaces of a dodecahedron left over from the 3D Printing sprues
    Resin printed dodecahedra next to a casting of a tree with four dodecahedra
    A tree of four resin dodecahedra next to two silver earrings with dodecahedra
    Dozens of silver dodecahedra and one resin one
    💬 0🔄 0⭐ 0
  • Jun 6, 2026, 10:46 PM

    At the beginning of the semester, our instructor told us we could expect to cast around 6 times in the class. I cast at least 24 times. My records are incomplete because sometimes I would cast multiple flasks on the same day with multiple prints of trees of dodecahedra, and only write down the weights for one.

    The general rule of thumb is that you should use _at least_ 50% "new" silver in each casting. But I'd only bought a certain amount of silver, and by the end of the semester, I'd utterly abandoned that rule and was casting 90% buttons or scraps.

    So. That's probably why the moon ring came out that way. And maybe I'd get better surfaces if I just used new silver. Good thing I'm taking Casting II next semester! [19/19]

    💬 1🔄 0⭐ 0
  • 💬 1🔄 0⭐ 0
  • Jun 6, 2026, 11:01 PM

    @stevegis_ssg I know! The department chair was surprised that I wasn’t upset. What is there to be upset about? This is soooo much more interesting than the ring I sculpted, and I learned an important lesson

    💬 1🔄 0⭐ 0
  • 💬 0🔄 0⭐ 0